Friday, April 30, 2010

CO CO CHI - by KOKKA

I'd like to show you this yummy print in my collection..
CO CO CHI E-Style is a Japanese fabric collection designed by Kokka. Unique in design, this tree landscape fabric with deer and birds is printed on a lovely medium weight fabric and is well suited to home decor projects such as cushions, lampshades, wall art and even upholstery.
Basecloth - 100% cotton
Fabric Weight - Medium
Fabric Width - 110cm
Colour - Pink and brown on eggplant
Motif Size - Trees are approx 6.5cm tall. Deer are 2 to 2.5cm wide.
Repeat Trees run horizontally down fabric length.

It is also available in these shades:


Aren't they all just yummy!! Have a lovely weekend everyone.. It's Golden week holidays here in Japan, meaning we have 5 days off starting tomorrow..Pin It

Wednesday, April 28, 2010

Celebrating MOM

As we approach Mother's Day, take time to thank anybody who has been a mother figure in your life.. THANK YOU!!
...and be grateful for a chance to be a MOTHER..
...and remember those who wants to but is yet to be blessed with their own, or never gets the chance to be one..

Head over to Dana and Disney who are celebrating MOM

In the spirit of the celebration, I made a matching apron and oven mitt. I originally made this apron as a two-way (see it here) but this time around, I braved myself to not add lining to the apron. I also tried making ruffles and it did turned out rather well in the end after buckets of sweat and a week of labour. 
 Please excuse the dimmed and poor pic of me trying to pose with the new apron. As I have left my manly-mannequin behind in our old town (which I now realise was a bad move) I am now mannequin-less..*sad*
 I had a wonderful time working on this oven mitt pattern. I bought one with similar pattern from 100yen shop and traced out the pattern. The outcome was rather satisfactory and I have since made 2 of these *grin* 
 I think this type of oven mitt with the thumb placement in front is better and more practical than the common thumb-at-side style. Which do you prefer?
Do you have any crafting ideas for Mother's Day??Pin It

Monday, April 26, 2010

Tea-time menu - pancake balls with strawberries

Since my last food post about rice gratin (read about it here) was rather a hit, I thought you'd forgive me if I'd posted another entry about something so easy to whip that-even-your-8-year-old-could-manage (I'm serious!!) yet sooo YUMM!! 

Now that the weather is warmer, and the kitchen is not below freezing, being in it is rather pleasant, and thus Sofea and I have been enjoying our mother-daughter time making pancake balls for tea.   
I use instant pancake flour bought from Costco (4.53kg!! and I have another unopen pack on my pantry *roll eyes*). I love this batter as you only need to add water and mix unlike other packets I used to buy, where you need to add egg and milk.  
This is actually tako-yaki mould (find out more about tako-yaki), you could use any other moulds as well. Spoon the batter into the mould, use tooth-pick to turn the ball once it browns.
The good thing about this mould is that it doesn't stick and you do not need to use oil to lubricate and I got it for only 500yen (about RM20) on sale *grin* 
They are yummy with strawberries and condensed milk.. or you can eat them with honey or maple syrup.
Do you have mother-daughter/son activities? Pin It

Saturday, April 24, 2010

This is how I do it - Bellows pocket

I just found out the expandable pockets I usually refer to are actually called Bellows pocket.

'A bellows pocket is patch pocket with an inset box pleat to allow the pocket to expand when filled. Bellows pockets are typical of cargo pants, safari jackets, and other utilitarian garments.'

 Searches on the net resulted in a couple of pages that provided tutorials on how to go about making these pockets. You can see them here and here

Thought I'd show my version and how I go about making them..
To me, making pockets seems mostly like just applying different folding techniques, and you might find ironning at every other stages helpful.

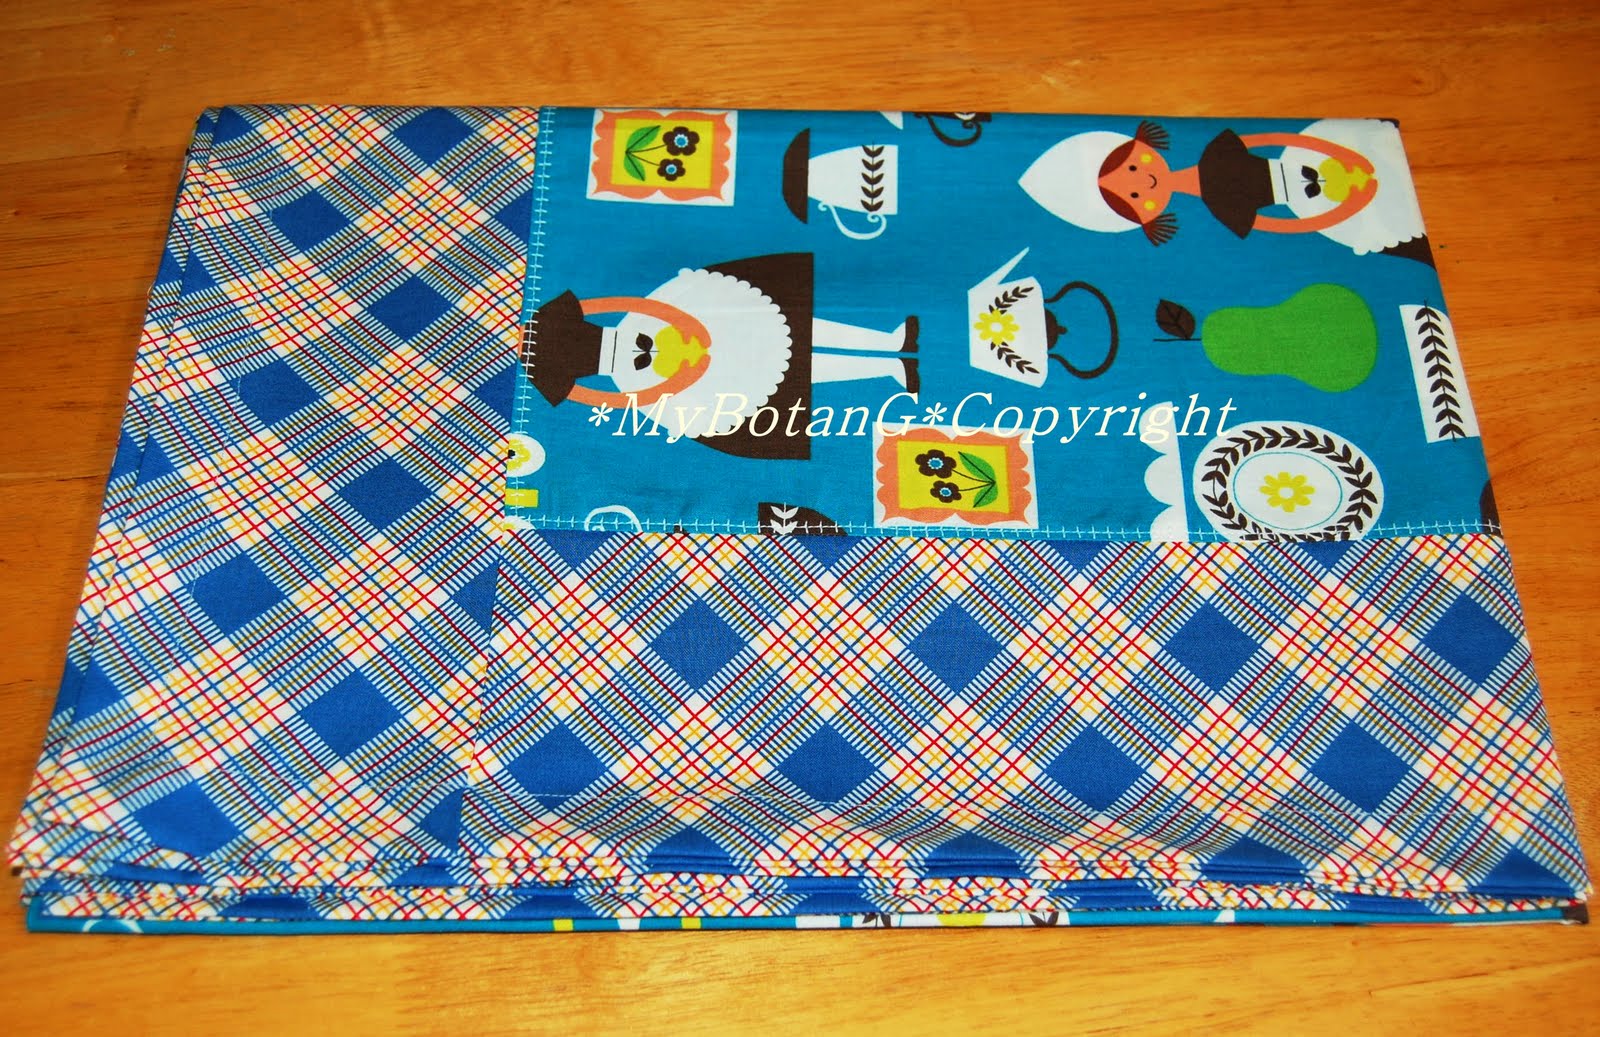
The finish completed bellows pocket in my Odekake bag.
First, cut your fabric depending on the number of pockets you were making. Here, I'm making two pockets, so I doubled my usual 18cm x 12cm plus 1cm seam allowance all around. You could add light iron-on fusible interface (learn more about fusible interface here)  to give the pockets a sturdier shape. However, I didn't fuse here *gulp* 
Next, turn and fold, I double fold the top, and fold once for the sides and bottom. You could serge all around to avoid fray, as you can see I don't serge *roll eyes*  
Sew the top part - I double stitch the top.
Next, fold the fabric in half and press, open and fold about 0.5cm on each sides of the centre line. Adjust the size depending on how deep you want your pockets to expand. (Note: I don't really take a ruler and measure, I just use common sense *yikes*)    
Do the same for the sides as well, now you have 4 folded edges creating 2 pockets. Sew along those edges, you will now have 4 crisp edges.  
If you need to add labels or any other embellishments, do them now. Next, position the pocket and pin all around.
Sew the centre line creating partition to the 2 pockets.
Sew the sides next and then the bottom part. And now you have a nice expandable pockets for your bag.
This is how my pocket sides look like.
Please go easy on me as I'm a newbie.. I would really love to hear your point of view, tips and suggestions on making bellows pockets in particular.
Pin It

Thursday, April 22, 2010

NUTS about thread

How much thread do you have in your sewing room..?? Do you think I've gone overborad if I have this much.. *giggles nervously*

I just hate the idea of being out of THAT particular thread in the middle of my sewing.. and besides I might just need THAT particular shade sometime soon.. ehem..

Tell me I'm not alone in this obsession.. 

So, how do you store all those threads, I hear you ask.. well I shade code them and put them in ziplock bags..
How do you store them?
Pin It

Wednesday, April 21, 2010

Blunt scissors...arrrgggghhh!!!

Among the worst thing that can happen to a sewist..having non-working scissors around the house.. don't you just hate it when that happens. Imagine being all eager and ready to cut your fabric to make something oh so fabulous and WHAM!!!! blunt scissors.. yikes!!! I was at witts end and ready to sucumb and throw out my ol scissors (present from my mom 6 years ago bought from Costway) when I stumbled upon this lovely tutorial about scissors sharpenning by the talented Tini (read about the tutorial here). Though  sceptical, at this point I had nothing to lose and so I gave it a try.. and walllaaaaa.. it worked!! so I gathered other blunt scissors of various sizes and got to work.. Thought I'd show you what I did following Tini's steps..

Gather all your blunt scissors and get a glass bottle, as you can see I got two..just in case, I had this notion that I might break the glass or something.. but let me assure you, the whole process doesn't harm or leave a mark on the glass..

Attempt to cut the bottle *grin* (meaning put slight preasure and move forward and backward a couple of times) repeat few times as neccessary. 

It even worked on my petit thread scissors.
The scissors feel a bit stiff after the sharpenning process, I have this idea that the particles/residue from the glass got stuck to the blades.. but scientifically I have no clue. But it works and I hope to add another 6 years to my ol scissors life span *grin*

Full credit to Tinihani for the great tutorial *HUGS*Pin It

Saturday, April 17, 2010

Something easy but YUMMY!!

I know this is a sewing blog, but I thought I'd share with you all out there the simplest and easiest dish to make ever!!
This is rice *gratin, it is more of a leftover dish that I make everytime I have some extra rice from the night before. 
Ingredients: 
rice
white sauce - I used carbonara sauce or you can make your own by melting butter in a pan, adding flour, stir well before adding milk - stir till mixture is thick, you can add salt and pepper for taste
grated cheese
veges - carrots, brocolli, corn, etc 
pre-boiled prawn or chicken (I use prawn) 

Methods:
Mix rice with white sauce, add prawn and vege, and pour grated cheese on top, baked in conventional oven at 300degree for 10 - 15 mins or till top is browned.

*Gratin is a widely used culinary technique in food preparation in which an ingredient is topped with a browned crust, often using breadcrumbs, grated cheese, egg and/or butter. Gratin originated in French cuisine and is usually prepared in a shallow dish of some kind. A gratin is baked or broiled to form a golden crust on top and is traditionally served in its baking dish.

Do you have any simple dish up your sleeves? Care to share?

Pin It

Wednesday, April 14, 2010

Crochet anyone?

I have been bitten by the crochetting bug lately (not that I'm any good at it). Recently visiting the local library with my girl, I checked out a Crochet book.  
Title: First Crochet Lesson
ISBN: 978-4-8163-4486-2
Published: 2008
Price: 1200yen/ RM48

As with almost all of Japanese craft books that I've come across, this book is totally self explanatory and suitable for independent learner, any individual could manage learning the crochetting steps from the detailed step by step pictured instructions.  
The book contains projects like flower and snow shaped coasters, mini flower motifs, edging laces and braid laces, flower corsages, square multi covers, mini mufflers, portable phone cases and tote bags. I have attempted the mini flower motifs and hope to try bigger projects in the future.
The reason I kept my wonky and crooked crochetting attempts till the end is mainly because if you've had seen these pics first, you might have stopped reading and blog hopped to something better.. *sigh*
Pin It

Sunday, April 11, 2010

Dreaming of Spring

Sadly NO, NIL, NONE, ZERO bloomed sakura to be spotted in our area yet.. and it seemed that I might miss the bloom this year. 'What's the big deal about sakura??' I hear you ask.. I can't answer for everyone else, but to me sakura bloom marks THE END of looooonnnnnnng harsh winter and the arrival of warm breeze. It marks the beginning of life and spring wardrobe (you should see the dull winter colours - grey, black, err did mention grey and the material type - all woolly and heavy *sigh*). So, since I'm yearning for sakura, let me show you some sakura pics from previous years taken by me around our small town.   
Sakura trees in full bloom along the river banks

Viewing sakura - Hanami (in Japanese) on weekends

Hanami - Malaysian style
Sakura trees

Happy Spring!!
Pin It

Thursday, April 8, 2010

Great expectation


I have written before about MyBotanG's Aiman Bag here, but here's another one that I've made recently. Surprisingly it turned out better than I've expected because I though the fabric rather dull in the beginning..  

I used chilli red thread to topstitch and red fabric to line the bag.
Have you got any project that turned out better than expected??
Pin It

Tuesday, April 6, 2010

Purse for the girls

There have been not much sewing lately, which kind of makes me cranky *grrrrrr* I have been packing and can't put off packing my fabric and notions any longer. So my sewing studio looks rather depressing at the moment. I have placed my sewing machine in the middle of the living room and so there is where I am most of the time nowadays. 

Coming back to sewing, I made these purses which I named ISLA bag recently for a friend's lil darlings.
Hope you all are having a productive week..
Pin It

Sunday, April 4, 2010

Table Cloth Take II

About 2 weeks ago I lamented the ordeal I faced while making my first table cloth (if you missed it, you can read about it here). This weekend I braved myself to make another, this time a 4 seater table cloth commisioned by another friend, and guess what.. it turned out SUPERBLY *grin* I used Kokka Trefle for the centre and Happy Campers Plaid Blue for the border.   

View of the back, as you can see I didn't sew lining this time around (as I shouldn't have with the first table cloth either *sigh*), I also in my own version mitered the corners (kinda following K.Dee's tutorial here

All in all, a rather satisfying project. I am definitely less freaked out about lininng-less projects.. ehemm.. maybe I need to get a serger next *grin* How was your weekend?? Pin It

LinkWithin

Related Posts with Thumbnails