Monday, May 31, 2010

Weekend Finds

We had a small get together at our home to celebrate our girl's 8th birthday

We wondered to a big indoor flea market nearby..
and look what I brought back with me *grin*
A 'lemari kaca' which is actually a music box *grin* 
and 3 stamps with teapots and teacups,
the music box and stamps all for mere 500yen (about RM20)

On the way back we stopped at a recycle shop..
I could have died with excitement when I saw this.. *happy beyond belief*
Brother - Fairline
HL2-B266
6500yen (about RM260)
It was love at first sight *heart* It's in very good working condition, and very clean. We brought it back (my hubby did actually - I just cleared the way), that's when I realised I need to take over the living room as my sewing studio *hhmmmm* The best thing bout it is it's NOT fancy at all..no buttons, no fancy stitches, no extra foot.. NOTHING.. and I'm very happy for that.. *hugs*

I can't seem to find any info/manual on the net.. Anybody out there has any info?? Please share.. 
Pin It

Friday, May 28, 2010

When I'm at lost for words..

As I'm sitting here fiddling and contemplating with what to write, I'm actually feeling rather nostalgic and myheart is swelling as I am at the verge of wailing my heart out.. My little baby girl is 8 today.. *sob* However, fearing you might roll your eyes at yet another story of how I was in 13 hour labour..yadaaa..yadaaa..yadaaa.. Thought I'd skip all that and show you some pics instead - not relating to sewing or craft but more of inspiration and relaxation which I think essential for crafters *grin*

Here I am trying my best to find the stairways to heaven, though seriously I just got dizzy and felt like I might tumble down the slope.. uhuhuh It's some belief that at this particular spot high on the hill if you bend down and look from between your legs you would see the stairways to heaven..
Koinobori - a festival celebrated in May marking children's day, where many houses will hang koi fish. The number of fish correlates with the number of family members - 2 big kois a.k.a parents, and 3 small kois a.k.a kids. Though we dont have this fancy kois, we did hang them one year, made from paper by Sofea in her kindy *where has 8 years gone...waaaaaaaaa* 
Craft shop - aha!! something related to sewing and craft (fuuuh!!) I get giddy with excitement when I find such shops, not that I purchase anything (handmade items are very expensive here) but just going around the tiny shop, looking at all those tiny stuffed fabric frog really satisfy my artistic need *theee heheh heheh* 

and last but not least, 'keropok lekor' here in Japan, seriosly!! on a bamboo stick minus the yummy dipping sauce.. oh how I miss Malaysia *sob* and yes, that's my hubby, though he has never said it out loud, I know he feels left out.. *coy smile*

Have a wonderful weekend!! Hugs and kisses for your lil ones.. before you know it, they are off to U and the house is empty and it's just you and your hubby all over again *wail*
Pin It

Wednesday, May 26, 2010

Fabric Scrap series - Patchwork Pencase

I had wanted to make a pencase for myself since the zip on my old pencase broke and this happened a year back.. Just imagine!! I've been carrying the same pencase with broken zip this past year..*roll eyes* I was too proud to buy one knowing that I could make one, but at the same time couldn't find the time to spare for myself.. The thing is I am intimidated when it comes to trying new pattern or design.. *sigh*

However, my fabric scraps projects gave me a chance to come up with the idea of making a quilted patchwork pencase. It was really fun working with all those scraps - matching and sewing *grin* 
Fully lined with no seams showing. Did you notice the lining is sewn backward, silly me!! but I was too lazy to take it apart *grin*
Verdict: Definitely will try making more (with the lining sewn correctly.. I hope)

What have you been up to lately..?Pin It

Monday, May 24, 2010

Thread tension - How to


It is a very daunting experience to be faced with thread tension problem. It almost sends a chill to my spine just thinking about it now.. *uuurrrrggghhh* However, it is better to be prepared and know what to expect when the time comes for a sewist to face the challenge of having thread tension problem on her machine.

I was so stressed out one afternoon to find the stitches uneven and the knot showing on the top of the fabric while the back looking normal that I could have cried. The Janome Super Secio PC's manual being in Japanese and having no English manuals on the net didn't help to ease my stress. I put away my machine and took a break for a couple of hours away from the sewing room just to relax and calm down. I searched the net for some insight into the problem and came across this site that explained thread tension in such flair and ease that I felt better just reading about it, cause now at least I know what is wrong and I felt more in control (if you haven't noticed it already, I'm a control freak...)

So, having survived the ordeal (drama..drama..drama) thought I'd share with you the enlightening paragraph about thread tension that I've found here.

Grasping a few basic concepts, one can understand how to adjust the tension on most any machine, regardless of brand and model.

Most domestic sewing machines are of the "lockstitch" variety. That means an upper thread and a lower thread "lock" together. If they don't lock together in the correct place, the tension is "off" and the seam lacks proper strength.

As the threads lock together, they form a knot. If this knot is in the correct place, it is never seen...it is hidden (locked) between the two layers that are being sewn together. When these knots are obvious on the bottom or the top sewing surface, it's time to adjust your tension.

Basic Concept: If you get a picture in your mind of the tension knob as a device to raise and lower these knots, it makes the adjustment much easier.

Steps1.Sew a test seam.
2.Observe the seam on the top and the bottom surface using a magnifying device if need be.
3.Find the position of the knots.
4.Tighten the tension and "pull the knots up" if the knots appear on the bottom side of the sewn seam.
5.Loosen the tension and "drop the knots down" if the knots are on the top surface.
6.Sew a test on the fabric you will be using. Tensions often have to be adjusted when changing fabric types and weights.
7.Continue adjusting the tension and inspecting the seam until your seam is balanced. 
 
Tips
Most machines tensions are tightened by turning the tension knob clockwise (see your owner's manual for the location of this dial). Conversely turning the tension knob counter-clockwise loosens the tension.


There are two tensions on most machines: The upper tension and the bobbin tension. Generally speaking, the bobbin tension never needs adjusting and the sewing person with just average skills can get into much trouble by changing this setting. It may end up with a trip to a professional repairman!

Credit to: http://www.wikihow.com/Adjust-the-Tension-on-a-Sewing-MachinePin It

Sunday, May 23, 2010

Japan = Hello Kitty & Doraemon

Do you love characters' prints?? like Disney, Pooh, Mickey,etc?? I don't actually *sigh* 
They are overpriced which many can't afford which in turn makes people opt for immitations which is more horrible as the fabric quality is compromised and sewing those fabric usually doesn't produce the satisfaction they ought to *double sigh*

I've had these Doraemon and Kitty fabric in my stash since last year. Originally bought for baby quilts, and I did produce 1 baby quilt from the Doraemon faby. A friend saw the faby in my album and requested some bags made out of them.. and just between you and me, I love how they came out *grin*  
I made a bento with handle (RM35) and a quilted multipurpose bag (RM100) out of the remainning Doraemon faby.
And, I also made a set bag (RM120) consisting of a multipurpose bag, a bento bag with drawstring and a bento bag with zip from the Kitty fabric.
Any fabric in your stash that you're not too keen on but secretly loving?? (sounds like a scandal.. heheh)
Pin It

Wednesday, May 19, 2010

More KOKKA sweetness

Among the many Matroyshka fabric patterns out there, I'd have to say Trefle KOKKA, Russian Matroyshka Nesting Dolls is my favourite.
More pics here


 I recently cut 2 dolls from my 2m stash, with right side facing sew around the doll with small openning at the bottom for turning and filling. I used scrap batting to fill the doll up.
Tadaaaaaa.. my new pincushion *grin*

My girl has requested one with strap to hang on her bag... *hhhmmm*

Do you have this fabric? What have you made out of it?
or What would you make if you had some..?

Pin It

Tuesday, May 18, 2010

Fabric Scrap series - Cards

What to do with small, odd sizes scrap fabric??
I match them with another odd sized scrap and sew them onto papers to make MyBotanG's thank you cards. It's nothing fancy, it's handmade which I'm a sucker for and I get to use the scrap fabric in my collection (woot!!) 
It is also a good way to relax and de-stress.. It is a way I reward myself after I've completed a quilt or some other sewing projects. I get to unwind with a bag full of scrap faby and loads of possibilities *grin* 
The best thing about making these, is that there is no need for plan or worries about things going wrong.
Just match this and that and sew, I leave the edges raw but you can glue on paper borders that would stop the edges from fraying.
Have you tried sewing on papers? It's a nice feeling.. Give it a try!!

Scrap Fabric series:
Heart
Birthday Card
All in one pouchPin It

Saturday, May 15, 2010

Another unexpected surprise

I wrote a while back about how sometimes a fabric on its own doesn't visual greatness but turned into something else brings out the best in that faby (read here)..
And today I was again surprised by how this faby turned out. It was definitely a pretty sweet surprise.
I've had this fabric in my collection for a while now (blogged here), I was uncertain about the pattern layout and how to go about cutting into it, untill recently, a friend requested an Odekake bag out of it. I contemplated over it for a while before cutting into it, I was still unsure of the end result until the last stitch was sewn. 

And now that I've seen the outcome, I'm already planning some other projects made out of this faby.
How's your weekend so far..?? I have a big BOULDER on my head and my nose is running and aaaaAAAAAccccCCCCHHHHoooooo...!!! *sigh*
Pin It

Wednesday, May 12, 2010

Fabric Scrap series - Tape

I hardly use store bought bias tape for binding. I make my own out of the scrap fabrics in my collection. 

The width of the tape depends on your need, you could cut it to specific sizes or like me just find the ones with similar sizes and lay them out. As you can see below, I have been working with blue(s) lately (more here). Rearrange the line up until you are somewhat happy with what you have.   
Sew the pieces together
Next, open the seam and press (iron). You could straightaway fold them like bias tape or..
.. just fold them neatly to be used for many different purposes later like as tie backs, handles, binding, borders, patchwork.. anything actually..
I used the blue tape as binding for my baby quilt truck
What do you do with your scrap fabrics..?
Pin It

Monday, May 10, 2010

This is how I do it - Pleated Pocket

Like with all pleats, besides being cute, it adds room. So a pleated pocket is roomier than the usual patch pocket. This is my first attempt at making pleated pocket and thought I'd show you how I did it.
Find more tutorials on how to go about making pleated pockets here.

First, cut your fabric, I used a round plate to draw and cut it in half  
Next, fold your fabric in half to get the centre line and open, you can now fold the pleats.
Decide on the type of pleats you want and the size of the pleats.
Put you half moon fabric aside, measure and cut the tape for the pocket top.
Adjust the width of the tape according to your preference.
 I have added bias tape around the pocket at this point before attaching the top part to the half moon.
Allign the top tape to the main body before sewing
Once you have attached the two sections, open and press the tape open and topstitch.
Turn and fold the tape (like you are making bias tape)
Place the pocket to the main body. Secure with pins.
As you can see, I made this pocket for the apron I made recently here
Once satisfied, sew around the pocket, remember to remove pin as you sew. And you are done.
Note: The thing that I would do differently the next time would be to lined and add fusible to my pockets, which would make sewing easier as it would be studier.
Pin It

Saturday, May 8, 2010

Baby Truck Quilt

I finished this baby truck quilt a couple of days ago and I always handwash and iron my quilts before packing and sending them to the rightful owners mainly because it allows me to detect loose threads or other things that I might have missed while sewing. Besides, the owner can start using the quilt immediately once it arrives.
If you noticed, I made similar quilt a while back - it was a single bed sized which is about 140cm x 210cm while this baby quilt is about 80cm x 120cm (read more about the quilt here).
The backing for the quilt is plain white cotton and I made the binding from my fabric scraps.

Pin It

Thursday, May 6, 2010

Fabric Scrap series - Pot holder

You know it's high time to tackle the mounting scrap fabrics when you can no longer close the cabinet door that contains the scrap stash *sigh*

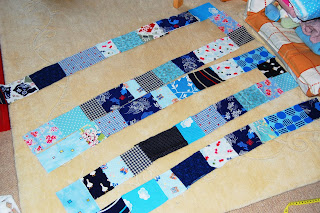
So, during the long holidays here in Japan recently (5 days), I brought the the whole stash and practically just dumped it right in the middle of the living room. That way, I figured I would just HAVE to face the truth and do something about the whole thing..
The first thing I made using shades of blue from my scrap stash is a quilted pot holder. A very simple and quick project. I made everything from scraps, the log cabin patchwork (for more ideas head over here), binding and even the batting are scraps joined together (read more here).  
Stay tuned for more project ideas made from fabric scrapsPin It

Tuesday, May 4, 2010

New Bag needs a name

I made this bag recently.
I used moda fabric for both the outside and the lining. 
Thought I'd have some fancy-schmansy name for it by now, but sadly I haven't.. 
So, I need your help in finding a name for this cutesy.. It would really mean a lot to me, and who knows if I like the name you suggest, I might send something along your way.
So.. pwetty-please... *grin*


Size: 33cm (w) x 23cm (h)
Handle length: about 50cm
1 inside pocket
magnetic snap for closure

Looking forward to hearing from you all!!
Pin It

LinkWithin

Related Posts with Thumbnails